Mixing for Modular: the Long-Awaited Prequel to That Other Thing
We’ve already talked about mastering in a previous blog post. There’s a lot that can be done (and needs to be done) at the mastering stage, but starting the mastering process with a good mix makes things come together much better. You wouldn’t put a bunch of fruit in a glass and call it a smoothie without blending it all together, right? The same goes for mixing a track. Who knew audio engineering could be so delicious?
In this post, we’ll talk about useful concepts, gear, and techniques for mixing your patches in the rack and making them sound fantastic. In the next post in this series, we’ll do it all again in our computer.
Hardware? Software? Both? Neither?
Obviously, mixing can be done in the box with software to great effect. However, since we’re Noise Engineering, we like eurorack, so we’ll be exploring the in-the-rack mixing options as well. First, we’ll start out doing some mixing with all Eurorack utilities, with the goal of getting a usable stereo track out of our modular and into our DAW, for either further processing or mastering later on. Then in the next post in this series, we’ll do a separate multitrack recording and do a much deeper mix in our DAW completely.
First, some vague yelling into the void
For whatever reason, not a lot of mixing utilities exist in eurorack. While simple compressors and equalizers abound in the rest of the hardware universe (in fact, if I were to be investing in, say, 500-series modules it would be difficult to choose a single compressor as there are so many). That hasn’t taken off as much as the other types of modules we get in eurorack. However, it’s definitely possible to build a great mixing section in your rack; there are things that Eurorack really excels at when it comes to mixing (sometimes even more than traditional hardware and software in my opinion). Maybe a manufacturer will change that in the near future? Who knows. *cough cough*
Some talk about the hardware
Without further ado, here’s (most of) the stuff I use when mixing in the rack, all described below:
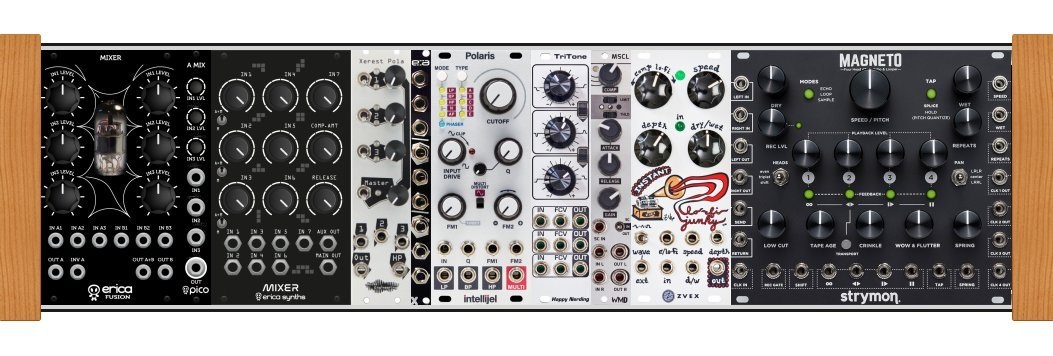
You may have some questions, and I actually didn’t really realize I’d be using a lot of these for mixing when I first got them, so let me explain. Left to right, we have mixers (lots and lots of mixers--I have seven audio mixers in my system and use them all constantly), a mult, filtering/EQ, compression, and DSP.
Why so many gosh darn mixers
I’ve shown four mixers I use in my system here, and they all serve a different purpose. The NE Xerest Pola is the main output mixer, basically putting together my drum bus, synth bus, etc. The Erica Synths Drum Mixer is a simple seven-channel mixer with configurable aux outputs and a built-in compressor. I always always ALWAYS bus my drums for further processing and this mixer is good for that. I really enjoy having a simple compressor built into my drum bus. Being able to “glue” together different drum sounds and add some punch is really useful, especially when there are quite a few elements, and the compressor in this mixer is really good at just that. Next to that, the Erica Synths Pico A Mix acts as my aux send -- more on that later. Lastly, the Erica Synths Fusion Mixer is a great mixer for anything I want to saturate. Remember when I said euro excels at some things? Saturation is one of them. I’ll often use this more as an effect than a mixer, but it’s good for a variety of uses. I’ve run whole mixes through it for more grimy, industrial stuff and it sounds great.
EQ(ualization)
EQ’ing is one of the places I feel Eurorack is most lacking. There are a few good ones, Mutable Instruments Shelves is probably the most popular, but they take up a lot of space in the rack to accommodate their many features. I really like the Happy Nerding TriTone. I have a few of them and use them for all sorts of things. There’s always one over my drum bus to cut low end build-up when necessary and add sparkle to the very high end, and sometimes cut rogue resonances with the mid cut. They also saturate (Eurorack REALLY likes saturation apparently) when driven in a really nice way so they’re also a great sound-design tool.
I’ve also included the Intellijel Polaris here. On an eq, very often there will be a high-pass filter and a low-pass filter. You know what there’s a ton of in Eurorack? Filters! And while they’re often not thought of as a mixing tool, they definitely are useful for shaping stuff in a mix. Polaris can be pretty transparent so it’s a nice choice for this, but the options are near endless.
Compression
Dynamics management and compression is, in my opinion, one of the most misunderstood subjects in all of audio engineering. Again, there aren’t a lot of compressors in Eurorack. They can actually be cobbled together using an envelope follower, an inverter, and a VCA but that’s a subject for another post. For now, I’m using my favorite compressor, the WMD MSCL. It’s good for bus compression, and since it has a sidechain input there’s a lot you can do to shape the compression (or just use it for sidechain ducking). I also have a Zvex Instant Lofi Junky which, to my surprise, has a surprisingly aggressive compressor built into it. It’s not really what the module was marketed for but I really like it over acoustic drums and samples like that.
DSP
This is the other area that Eurorack really excels. Some of my favorite reverb and delay comes from Eurorack modules. Here, I’ve just included my Strymon Magneto, which is a great-sounding delay and spring-reverb emulation (spring reverbs are fun but digital ones are way less prone to interference and the like). I use it a lot on multiple sources in a mix to add space and atmosphere.
Cue the angry hordes: software is better for some stuff
As hardware excels at some things, there are other things that, at this point, software is a lot better for. Analog mixing has a lot of advantages and it can sound great, but software has many, many advantages in this day and age. I always aim for hybrid mixing, because it will offer me the best of both worlds. So on that note...
Let’s make some noise
Now that we’ve talked about what gear we’ll be using, let’s do some mixing. I’m going to do a bunch of in-the-rack mixing in this first post. The next post in this series will be all about software mixing: I’ll multitrack the same loops without any in-rack mixing and do it all again in software, just to demonstrate two different workflows.
Starting out simple: just the drums
Starting out, let’s mix a drum loop. It sounds like this:
It’s a pretty simple dance loop. BIA covers the kick, two Intellijel Plonks cover clap and hats, and an acoustic snare from the 4ms Stereo Triggered Sampler rounds things out.
I wanted to do quite a few things on this loop. I know there will be a couple more synthy layers added later on and I wanted to make sure it cut through nicely and didn't take up more space in the frequency spectrum than it should; if there are too many elements in the same frequency they tend to get lost and lose all their impact (something important to keep in mind when mixing and creating sounds). I also wanted to preserve important frequencies and keep it punchy. Lastly, I wanted to add a bit of atmosphere in the mix using reverb and delay, allowing me to make different elements seem closer or farther away in the mix. There’s a couple of interesting things that had to be done to achieve this. First, here’s a rack of the patch:
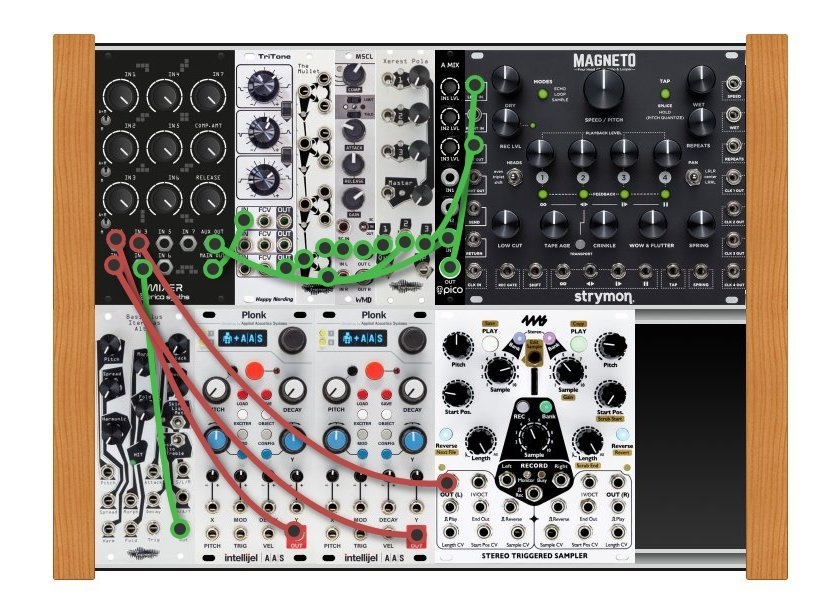
Turns out spaghetti is still an issue even when it’s virtual. First, my four voices get mixed in the Drum Mixer. The Aux Out (just a copy of channel 1-3’s outputs) gets sent to the A Mix which is acting as an aux send.
A quick note: what’s an aux send?
If you’ve ever used a hardware mixer, it probably had aux channels. If you’ve ever used a DAW, it almost definitely had aux sends. Aux sends basically take a signal from a mixer channel, split it off, and process it separately. Most commonly, aux channels are used for something like reverb or delay where it makes sense to be running a bunch of elements through the same effect. For reverb especially, it’s useful as it puts everything in the same artificial “space,” and if you’re mixing in the box, it saves CPU, as you’re only running one reverb plugin.
Here, you’ve seen me basically patch my own aux send. XP doesn’t have aux channels, but that doesn’t mean we can’t make our own. By splitting a signal out to a second mixer (in these examples the A Mix), we can control the amount going to our main mix as well as the amount going to our reverb/delay (Magneto in these patches).
Auxes have many many uses, like parallel compression as described above, and any other scenario where processing one signal in multiple ways makes sense.
Back to the patch
The A Mix output goes to the Magneto in, the Magneto out goes to the main mixer. All I’m using is the spring reverb emulation with no dry signal on the Magneto. The Aux out on the Drum Mixer only contains snare, hats, and clap in this patch so it’s just adding a tiny bit of space to the higher frequency elements. Generally, I don’t add reverb to kicks. Especially in dance oriented music, a kick is often the most important element in a mix. Adding reverb will make it seem further away and smaller. A tiny bit can be useful to make it feel like it’s in the same room with everything else, but in this particular patch I didn’t feel it was necessary.
Next, the main output of the Drum Mixer (all four voices) goes out to the Tritone. First, I’m cutting a little bit of the low end so that it isn’t so overwhelming. This will really make a difference when it comes time to add some synths, as the low end will start to get very crowded. I’m boosting the extreme high end by a few dB just to add some shininess to everything (this is a very common technique to make things sound less dull; boosting 12khz doesn’t sound like it’ll do much but it can be a very nice touch). Lastly, I’m using the middle band to make a small cut around 2khz just to add some character to the clap and kick.
That signal is then split into two using my Extra Mullet.
Another quick note on parallel processing
Time to interrupt myself again! Parallel processing is a very useful technique, and it’s slightly related to aux sends (we’re again processing one sound through multiple effects simultaneously). Its most famous use is that of “New York” style compression, where a signal is compressed heavily and then mixed back in with the dry signal. Some compressors feature wet/dry knobs to do just this. The MSCL doesn’t have a wet/dry setting so I’m simply splitting the signal into two, processing one, and then mixing them back together.
I’m using the MSCL to heavily compress the drums and add a lot of punch to the kick, clap, and snare. The MSCL’s makeup gain sounds really nice as well and adds some saturation, so I used more gain than I really needed to add character and then just mixed it back in a bit more quietly than I normally would.
The result is I have the smooth sound of the uncompressed signal, and the punchy, saturated sound of the slightly overcompressed signal, giving a very nice tone to everything.
Watch your head
While I was mixing this patch, I was reminded of something that is often forgotten: headroom. Broadly, headroom is basically how much signal you can put into something before it clips. The TriTone sounds great when clipping, but that would add a lot of saturation (gentle distortion), and for this patch I didn’t want to saturate it at that stage. Inputting the drum loop to it directly caused quite a bit of saturation, so I just backed it off at the Drum Mixer and brought it back up later on in the patch. Remember, volume is a tool, not a goal: you can always make things louder in the mastering stage, but if you clip something early on when recording you may run into issues later on. You can’t undo a distorted recording!
Check it outttt
Now that we’ve done some mixing, our drum loop sounds like this:
Much better, right? I encourage you to go back to the original clip so you can hear how much of a difference a little mixing makes.
Thanks for the melodies
Now that we have a nicely mixed drum bus, let’s add some synths.
I have a lead line from Loquelic Iteritas Percido, and an arpeggio from Ataraxic Iteritas. Nothing crazy going on, but it’s a fun little loop all the same. Here’s what it sounds like with zero mixing:
Notice that, overall, everything sounds very muddy. It’s hard to pick out the drums, the lead sounds a bit dull, and the arpeggio is a bit boring. Time for mixing!

This one’s a bit less complicated than the drum mix, but uses a couple of important concepts I’ll branch off and go into more detail about. First, though, an overview: LIP is its own voice, and is split up into my A Mix and my main mixer (XP). Ataraxic Iteritas is run through an Intellijel Quad VCA and modulated by a Pons Asinorum. That voice is also split and sent to the A Mix and the main mixer. A Mix is still going to Magneto, which adds some space to the synths, and Magneto runs out to the main mixer. The main mix out runs through another TriTone. I cut a little bit of low end (not as much as on the drums), boost the highs (a slightly bigger frequency range range than I did on the drums) and cut a notch out of the low mids to make space for the snare. It’s then run through the MSCL. The kick drum is split and sent to the MSCL’s sidechain input to duck everything out of the way and make the kick seem super punchy.
Let’s see how it sounds. All the mixing on the drums from before is obviously still going on too, so you can hear how everything goes together:
Pretty cool, right? Everything is much more clear, punchy and bright.
Now, before we finish up, I should make a note.
Sidechain compression: the most misunderstood concept in all of mixing
Sidechain compression, thanks to dance music, is now generally thought of as ducking a signal to a kick drum, as we’re doing in our example here. While this is a great and useful way to use a sidechain input on a compressor, this is by no means the only use of external sidechain processing. Most compressors use sidechains internally, you just don’t see them.
My favorite use of an external sidechain input is using it to control how a signal is actually compressed via filtering. Let’s take that drum loop from the beginning and process it slightly differently. Here it is again:
I’m going to run the whole loop directly through my MSCL again, but with no parallel compression this time. I only want it to compress when a higher end signal occurs (such as a kick transient, clap, or snare) but not be bogged down by the low end from the kick. I’m going to split the drum loop again and run the signal we’ll hear to the input of my compressor. I’m going to take the other copy of the drum loop, run it through a high pass filter to take out all that low end from my kick, and run that to the sidechain input on my MSCL.
First, here’s how the compressor settings sound without the external sidechain filtering:
See how it sounds overcompressed? Now we add the filtering:
Sounds much better! I’d definitely encourage experimenting with this technique as it’s useful in a lot more uses than you may expect. A lot of software compressors can be used in a similar way, some even have EQ’s built into them for exactly this purpose!
Another note: using Eurorack as a mixing utility
We have all these great pieces of analog and digital hardware in our racks. I obviously use Eurorack quite a bit when I’m composing, but I use software synthesizers, recorded sounds, and other purely in-the-box material quite a bit in my productions as well. What if I want to use some of my awesome Eurorack utilities on that stuff?
There are quite a few ways to get external audio into Eurorack for processing, so I won’t go over them all here. However, my favorite method is relatively simple.
I’ll render out whatever audio I want to process, load it onto an SD card, and drop it into a sample player in my Eurorack system. Then I just patch up whatever I want to process the sound through, hit record on my DAW, and press play on the sampler.
There are quite a lot of samplers and sample players in Eurorack, but I currently use the 4ms Stereo Triggered Sampler. It’s stereo, has a very high bit depth and sample rate (which can actually make a difference when being processed by analog gear, it’s not completely hype here) and can play back very very long samples which is useful in a mixing context. It can also simultaneously playback sounds and record them at the same time so I don’t have to use my workstation at all to do some mixing if I don’t want to, and I can process the same sound multiple times without editing files each time. Super handy!
To be continued
This was a fun exercise demonstrating in-the-rack mixing. But what about all that fancy shmancy in the box computer stuff? Check back soon for part 2, where we do it all again… but in the box instead!